


Step 2. Writing steps of assembly.
Difficult aspects of dolls
Iris's design requires her to wear a turban so thus I had to find a way to make it stiff enough to keep its shape through play. I decided on using a styrofoam ball which was glued to the head and covered; the hair attached was also glued to the ball and this allowed for the structure to stay and the hairs to be well attached. This would also be more economical to make on a large scale.
the turban was made with a piece of fabric that was cut in the shape of a wide ice cream cone. the raw edges were finished with some bondaweb. the turban was then wrapped around the head and glued in spots that would overlap and thus could be hidden. Finally, small stitches were placed in the turban to fully secure the turban to the head.


to get the snake clay to harden to the right shape I first had to make a tin foil ball the size of the head. After baking I took the snake while it was still hot and wrapped it around Iris's head; covering it with a plastic bag and securing with a rubber band, leaving it to fully cool. finally, the teeth were glued on and details painted.
Iris's skirt was the biggest challenge in making my dolls. Firstly I made a paper mock-up of the skirt and attached it to the body with tape to gauge where the pieces needed to be placed. Then I rolled polymer clay into snakes of the same width and cut varying sizes, these were then made into circles and flattened. The ends were scored together; a technique I learnt while working with ceramics. The pieces of the skirt were made in small sections and baked in the oven at 180*c for 30 minutes each. a waistband was made and heated on a tinfoil armature of the waist. after these were baked I used UHU glue to attach small portions to the waistband and propped it with foil; I repeated this till I had a full half skirt.


The socks were made from knit stretch cotton and pulled taught along the dolls leg. With good sides facing in I pinned the sides as close to the leg as possible. they were stitched with a running stitch and were then turned inside out to create a clean and tight fit. they were then finished off with gold paper attatched with UHU glue.
Overall I am very happy with the outcome. I loved using unconventional materials such as wallpaper to create an outfit. This was inspired by Lineysha Sparx's wallpaper dress from RuPaul's drag race season 5. In the future Id like to work on possibly making a removable outfit for her to add more playability to the doll; also possibly cast the hoop skirt out of a more flexible durable material for any kind of mass production so there are no weak points. compared to my concept I feel like I captured the demure essence of the character and I'm extremely happy with the outcome.

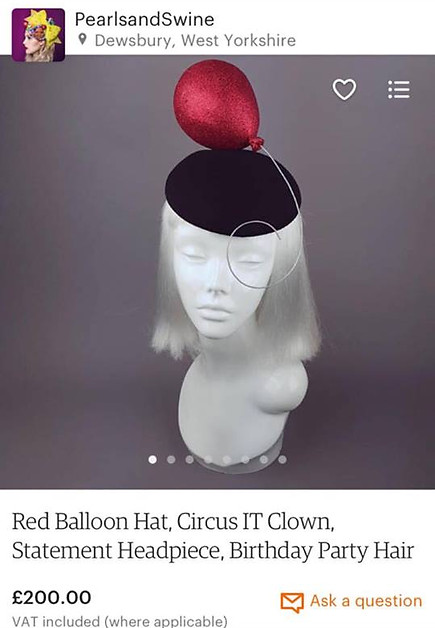
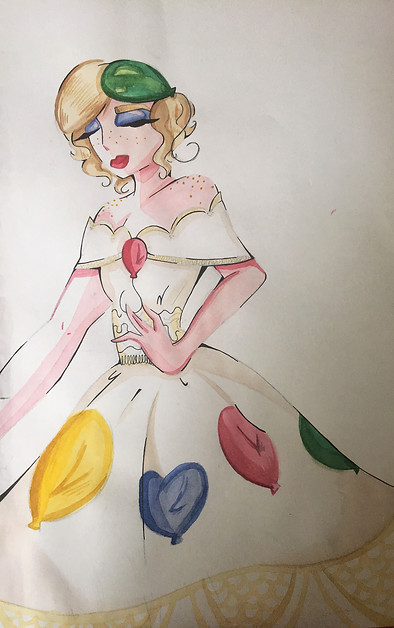
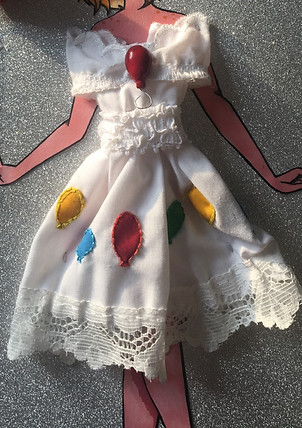
I wanted to tackle making a removable outfit for a doll which would entail making a small garment. I wanted to do this because toy making companies often sell fashion packs to maximise profit from parents who see no need buying more than one of the same character. I wanted to create a concept around the idea balloons as I was inspired by this Steven king fascinator from Etsy. I felt really inspired by this because it looked really unique and gave me a very vogue feeling. I thought of a bell-shaped skirt which flairs at the waist with balloon embroidery embellishments. I created a concept inspired by watercolour fashion illustrations.
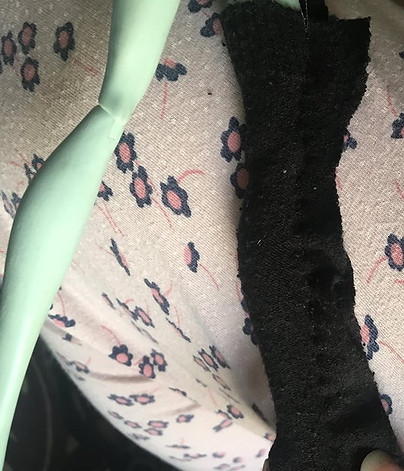
Firstly I had to find an outfit I could take apart to use as a base for the outfit. I chose a simple generic dress that I could add onto and took it apart; after the pieces were taken apart I drew out a pattern on paper by tracing the pieces and altering as needed much like creating traditional patterns. I ended up removing the straps and replacing them with an off the shoulder detail as its modern and thus would relate to a more modern audience.(pictures from dollightful) I also had to alter the dress so it would fit a monster high body, the waist size was altered by placing the cut chest area over the doll and cutting as much off as needed. Also leaving a seam allowance of about a cm.

Step 1. Selecting the dress
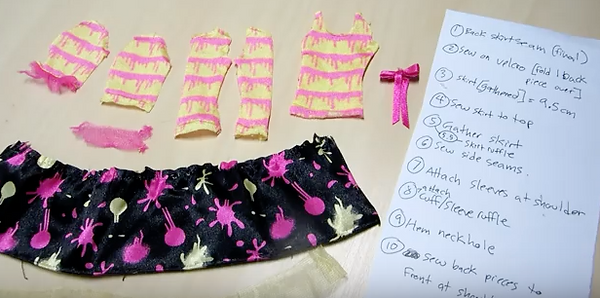


Step 3. Trace the pieces onto thin paper for your final pattern.

After I made the pattern I traced it onto some cotton fabric and stitched it together, I found it difficult to use the sewing machine on the tiny garment so I ended up using a needle and thread around the top of the bodice and waist. The skirt had a gathered look due to the way it was put together which was overlapping parts of the fabric to make small pleats in the waist. the top and bottom of the dress were hemmed by folding over the raw edge and sewing them together. I then finished the raw edges with lace and the off the shoulder was made with a piece of lace stitched in the middle to give a sweetheart shape. I then tried the garment on a model doll and decided the outfit needed a belt which I made from a piece of stretch lace.
I wanted to paint the balloons with fabric paint, however, I should have tested the paint on fabric before beginning as the colours spread dramatically and I had to remedy this with embroidery. This gave a clean edge but also textural variety.


I made the fascinator and charm out of polymer clay which hardens in the oven and is very durable, the pieces were then painted and sealed with acrylic gloss. In the future id make the pieces out of the intended colours instead of painting them to prevent chipping. the strings are made of wire which could pose a problem for younger children and could cause injury so in the future id prefer it to be moulded out of some kind of rubber.
The garment was tried on a model with a closer body type one more time to test out the size and look. Then was put into packaging; I decided I wanted to take inspiration for the packaging from Novi Stars as I love the idea of seeing the outfit on a doll without having to purchase another doll


I made a paper doll of Parasol and chose 3 kinds of glitter paper; I got a few friends to vote on which they prefer and it was said that the silver brought out the white and highlighted the colours in the dress so that was chosen.
The doll was then glued to the backing and then the dress was placed over. The piece was attached with small knotted threads which were stitched to the paper with a silver thread; this is barely noticeable and easy to remove the piece from the paper, it also eliminates the needless waste of plastic over the garment to stop it moving which is an issue I see with the Novi Stars pack. The balloon (made from a polystyrene ball and wire) was passed through two cuts in the hand and secured at the top with a thread. finally, 2 balloon shaped papers were put on the paper with the names balloon ball fashion pack and it would be placed in a plastic bag.

In the future Id also like to work on a backing card to display the other fashions available and a front piece to put on the base with the celestial circus name and logo. Overall I'm happy with what I produced and in the future I'd like to make more experimenting with more complex patterns and possible add jewellery suits as packs aswell.